

If you see the “Cannot Verify Server Identity” on your iPhone’s display, the server certificate for the mail is not legit. You can’t send or receive emails because your iPhone can’t verify the server name or identity.
Moreover, that’s a serious iPhone error if you use it for daily emailing purposes. But the good news is that you can quickly solve the problem using simple methods.
So, let’s move on to the details of the outgoing server verification and see how you can fix it.
Table of Contents
What is the Outgoing Mail Server?
An outgoing server is a digital mailman that carries out the delivery of your sent emails. Since it’s an outgoing server, it’s responsible only for the sent information.
Moreover, the most common outgoing server is SMTP (Simple Mail Transfer Protocol.) Your mail client, say Gmail, makes an address, particularly for sending and receiving emails. For example, the SMTP server used by Gmail is smtp.gmail.com.
Besides, you can check the mail server identity in the mail client’s settings.
Importance of SMTP Server
The SMTP servers are essential for communication via emails.
When you send an email to a recipient, the email doesn’t go directly to the person. Instead, it first gets encrypted into a code. Then the code is sent to the SMTP server. Also, your iPhone securely connects to the mail server at the beginning of the communication.
Now, the SMTP server translates that code and forwards the message to the next phase. Moreover, SMPT ensures that the outgoing email is from a legitimate email account. So that creates a secure connection, and your inbox doesn’t receive spam emails every day and night.
These are some popular mail servers:
- AT&T
- iCloud
- Gmail
- Outlook
- Yahoo
Besides you can also integrate the mail server certificates into your server. A mail server certificate enhances the security of your communication via emails. Also, these certificates are helpful if you visit a website, especially an e-commerce one.
Therefore, always check for the SSL certificate on the website you visit. If you are a developer, integrate a mail server certificate into your website. It will keep away hackers and intruders from breaching the security of your connection.
Why Does my iPhone 11 Keep Saying, “Cannot Verify Server Identity”?
Sometimes the SMTP settings of your email account need to be changed. For example, you might not get any notification for the server identity settings, but checking them frequently is recommended.
Also, as it’s the server side of the leading service provider, an issue might happen with the client’s server identity.
The iPhone mail app can also fall into the iOS bugs, or it might be due to the random in-app errors in the iOS device.
That’s when you get the message iPhone “Cannot Verify Server Identity.” But it’s a temporary issue, and you can quickly fix that.
What to Do When iPhone “Cannot Verify Server Identity”?
Apple experts have suggested a few methods to solve this issue. Moreover, you can apply these methods without any external help.
So, let’s look at how to fix the iPhone “Cannot Verify Server Identity” error.
Restart iPhone
To fix the mail server identity error, try restarting your iPhone first without making any technical tweaks. This method solves the minor software glitch that might be causing the server identity error.
Restart iPhone X, iPhone 11/12/13
- Press and hold the side or power button with either of the volume buttons till a slider appears.
- Slide the slider to the right, “Slide to power off.” Once you drag that, your iPhone will shut down.
- Wait for a few seconds till the iPhone completely powers off.
- Now again, press and hold the side or power button. When the Apple logo appears, release the button. Your iPhone has restarted successfully.
Restart iPhone SE/8 or earlier versions
- Press and hold power or the side button.
- Once the slider appears, release the buttons.
- Now, drag the slider to the “slide to power off” option and wait.
- Once your iPhone’s screen is entirely black, it’s powered off.
- To turn on your iPhone again, press and hold the power button. Then, keep pressing it until the Apple logo appears.
After successfully restarting your iPhone, check if you are getting the server identity error.
If yes, let’s move on to the following method.
Restart the Mail App
Since the “Cannot Verify Server Identity” error is linked with the mail server, you can try restarting the Mail app on your iPhone.
The Apple Mail app allows you to send and receive emails instantly. However, other built-in or third-party apps can also cause this issue.
So, quit the Mail app and follow these steps to quit all background apps.
Quit Background Apps on iPhones Having Home Button
- Land on the Home Screen of your iPhone.
- Swipe up on the screen and pause in the middle.
- In the App Switcher, swipe right and left to select an app you want to close.
- Once you select the app, swipe up the app’s card on the screen.
Quit Background Apps on Older iPhones (8 and earlier)
- Open the App Switcher by double-pressing the Home Button.
- Swipe left and right to move between the apps.
- Pause on the app you want to close.
- Swipe up to close that app.
You can keep closing all the background apps like that. Besides, ensure you don’t close any app without saving the work progress.
After closing those apps, relaunch the Mail app and see if the verified server identity issue is resolved.
Remove and Add Your Email Account
After restarting the Mail app, do the same with your email account.
No doubt, the email accounts on iOS devices are reliable. They use S/MIME encryption to establish a secure connection. But when the “Cannot Verify Server Identity” error occurs on your iPhone, you can fix it by removing your email account and adding it again.
Besides, this method fixed the server identity issue claimed by many iPhone users. Therefore, follow these steps:
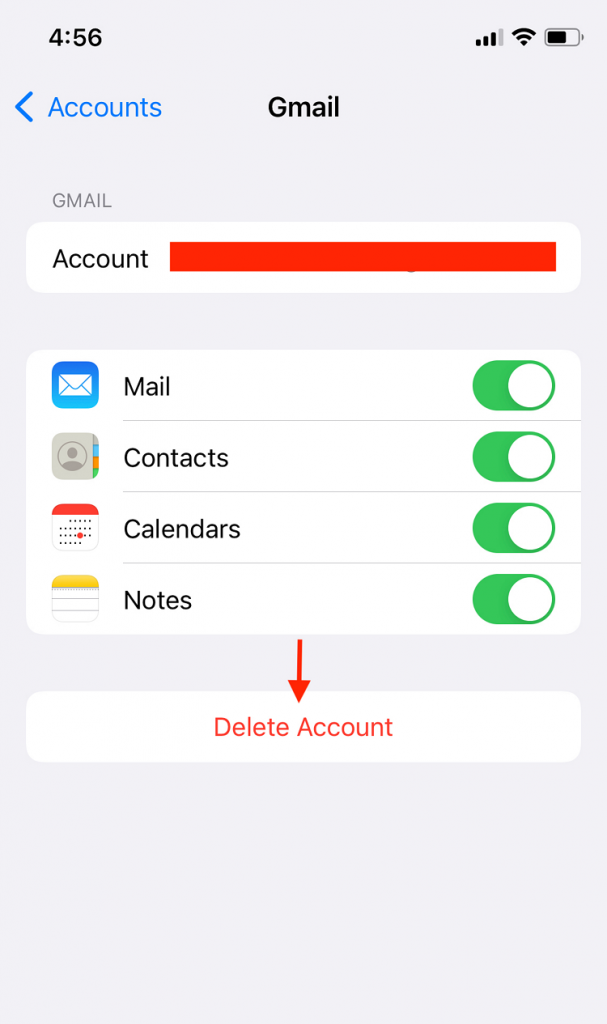
- Open the Settings app.
- Go to Accounts & Passwords.
- Tap Accounts.
- Now, please select the email account you want to delete by tapping it.
- You will see the delete account button. Tap Delete Account.
- When the confirmation alert appears, tap “Delete from My iPhone.” That mail account will be deleted.
- Now, repeat Steps 1 and 2.
- Tap Add Account.
- Choose your email service provider.
- Complete the procedure by following the on-screen instructions.
Furthermore, if you use multiple email accounts, you must follow this method for each account. You never know which email account is causing the “Cannot Verify Server Identity” issue. So, one by one deletes the account and then add the account to get rid of this message.
Update iOS Version
Apart from the mail server certificates, this issue might occur due to the old iOS version. For example, you tried deleting and adding back your email account. But the issue is still there.
Therefore, let’s upgrade the iOS version of your iPhone.
Apple launches iOS updates once in a while. These updates are for all iOS devices. Moreover, an iOS update aims to fix minor software glitches and enhance usability for Apple users.
Undoubtedly, the latest iOS version can fix the verified server identity issue. But remember that your iPhone must have a stable internet connection to improve the verified server identity problem.
Follow these steps to update your iPhone:
- First, go to the Settings app.
- Go to General.
- Select Software Update.
- If there’s an iOS update available, you will find a blue option, “Download and Install” update.
Besides, your iPhone will not update iOS if there’s insufficient storage available.
Apple experts also recommend updating the iOS and carrier settings with these settings. To update carrier settings, follow the next section.
Update Carrier Settings
If you believe the issue is due to the network carrier, it’s time to update the carrier settings.
Your service provider provides a network through which you can securely send and receive emails through the mail server. You might have to apply manually if there’s an update in the carrier settings.
Therefore, follow these steps for the carrier settings update process:
- Open Settings on your iPhone.
- Go to General.
- Select About.
- Now, scroll and go to Carrier.
- You will see the on-screen instructions. Follow them to update the carrier settings.
Reset Network Settings
It’s the last resort to fix the iPhone “Cannot Verify Server Identity” problem. However, this method will reset all the customized network settings, including the server identity issue.
While you reset the network settings on your iPhone, all the wireless configurations will be lost. That includes:
- Wi-Fi Passwords
- Bluetooth Connections
- VPN and APN Settings
So, follow these steps to reset the iPhone’s network settings:
- Open Settings.
- Go to General.
- Scroll down and select Reset.
- Now, tap Reset Network Settings.
- When the confirmation alert appears, enter the iPhone’s passcode.
- Finally, tap Confirm to reset the network-related settings on your iPhone.
Once done, all the current network settings will be set to factory reset default settings. Unfortunately, you will have to configure all the Wi-Fi and network configurations from scratch.
So, check if you still get the iPhone “Cannot Verify Server Identity” message. If the error persists, contact Apple Support.
Conclusion
SSL certificates are essential for email security. However, your iPhone will show the “Cannot Verify Server Identity” message once it realizes something is wrong on the server or client side.
So, follow the above steps and try to fix this issue. You can also seek help from Apple support. They will fix the email server issue, and you can again send and receive emails on the iPhone Mail app.