iOS devices such as iPhone, iPad, and iPod touch offer Apple users many options in capturing and storing special moments. From clicking photos to recording a special event, the camera app of Apple devices offers unique and exciting features.
Moreover, thanks to COVID-19, virtual calls, video calls, and live sessions have become an everyday staple. Apple Inc has added some great features to its device that allow you to capture live moments. Amazing, right?
The FaceTime app is the flagship app of Apple devices, letting you make audio and video calls to other iPhone users. It also can capture live photos to store and reminisce about your favorite FaceTime video call.
However, how can your capture photos from FaceTime call, and where do these live photos go? Keep reading this article if you’re clueless about making the most of your FaceTime call.
Important Thing to Remember: If you have enabled the live photos on FaceTime, the other person will be able to capture your pictures. Similarly, if they turn on FaceTime live photos, you can capture their pictures.
Table of Contents
Turn On FaceTime Live Photos on iPhone and iPad
The FaceTime live photos feature in FaceTime is automatically enabled on iPhones and iPad by default. But if you’ve changed, modified, or reset your settings, you can also re-enable facetime live photos.
Follow these step-by-step instructions:
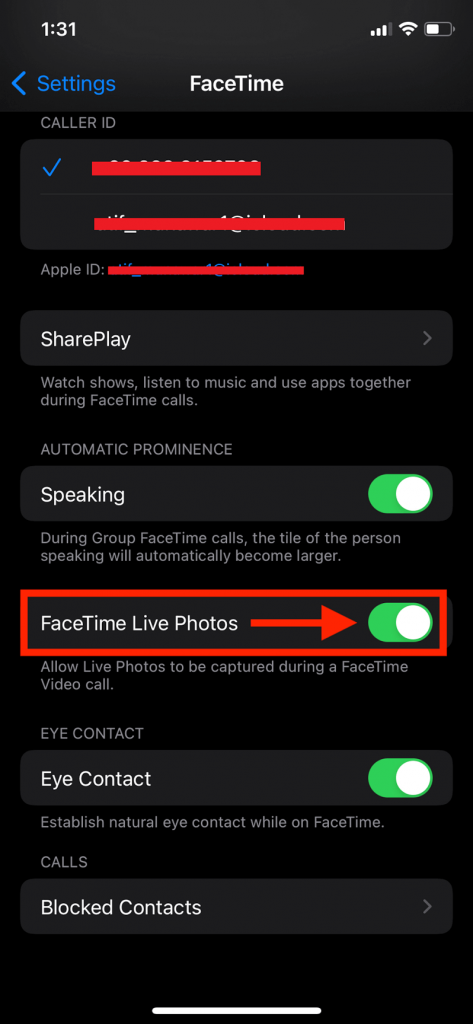
Step # 01 Navigate to the Settings app on your iPhone, iPad, or iPod touch
Step # 02 Scroll down to the “FaceTime” section (below the Messages tab)
Step # 03 Tap the FaceTime app and scroll to the “FaceTime Live Photos”
Step # 04 If the toggle next to it is grey, click on it to turn green
Step # 05 The green toggle indicates you enable FaceTime Live Photos
Take Live Photos on FaceTime during Video Call
Once the live photos feature is enabled in facetime, you can easily take a live photo during a FaceTime call. However, there are several cautions.
First, the person you’re speaking to on the FaceTime video call must also enable FaceTime live photos on their iOS device.
Second, iPhone users can not take a live photo without the other person knowing. The FaceTime app notifies the other person if you have captured it during video calls.
Lastly, the FaceTime live photos feature isn’t available in every country or region. So, if you can’t enable FaceTime live photos to feature on your iOS device, search if it’s available in your country or region.
Here’s how you can take a live photo during a FaceTime video call:
For Group FaceTime Call
- If you have a group call, you first need to choose the FaceTime window of the person whose photo you wish to capture.
- Click the FaceTime window to expand it. Make sure it fills the screen of your iPhone, iPad, or any device.
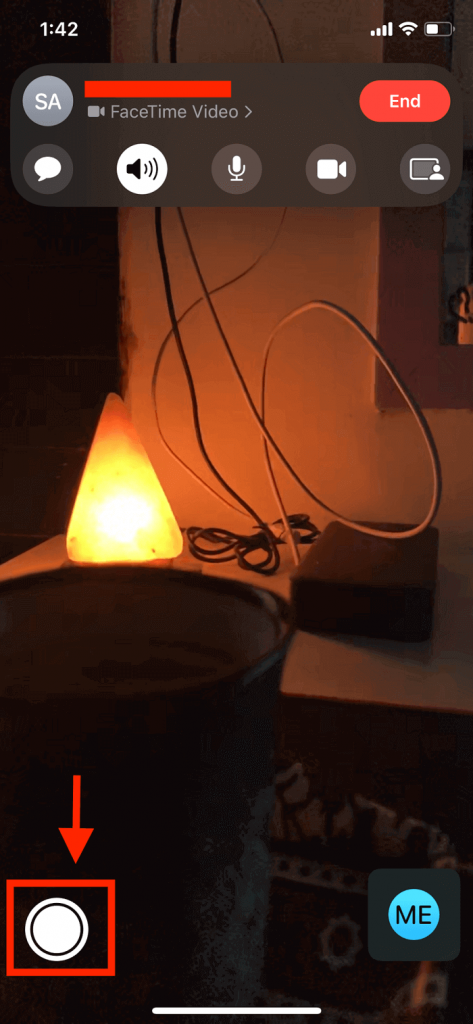
- Tap the Shutter Button on the left bottom corner to take a live photo
For One Person FaceTime Call
- Capturing live photos in FaceTime with an individual requires the same steps as above. In addition, make sure the other person you’re FaceTiming has enabled the live photos in FaceTime.
When you tap the white shutter button to capture the photos, the camera catches a fragment of a FaceTime video call. It is similar to the live photos feature in the iPhone and iPad’s camera app.
Enable the FaceTime Live Photos on Mac
If you want to capture live photos from FaceTime on your Mac device, you must enable the FaceTime live photo feature from both devices (e.g., your iPhone and Mac)
The live photos feature works only in macOS High Sierra and macOS Monterey. Follow these steps:
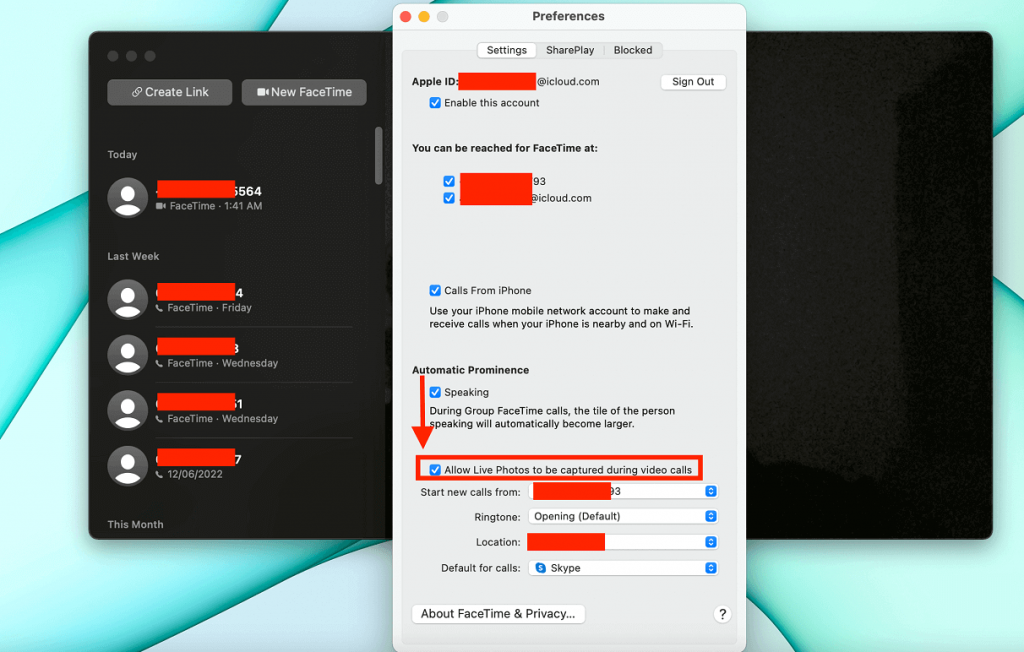
- Open the FaceTime app on Mac
- Select “FaceTime,” and a side list will appear
- Click Preferences
- In the Settings tab, check if the box labeled “Allow Live Photos to be Captured During Video Calls” is ticked
Location of Pictures Captured from FaceTime Live Photos
One of the most common aspects that confuse any iPhone user is where the pictures captured from live photos in FaceTime go. The FaceTime app directly saves the snapshots to your Photos app.
For iPhone and iPad:
To see images from FaceTime live photos app, follow these steps:
- Open the Photos app on your iPhone and iPad
- Tap on the Albums tab on the left corner
- Find the Album named “Live Photos.”
- All the images captured from FaceTime and the Camera app are in this Album.
For Mac Computer:
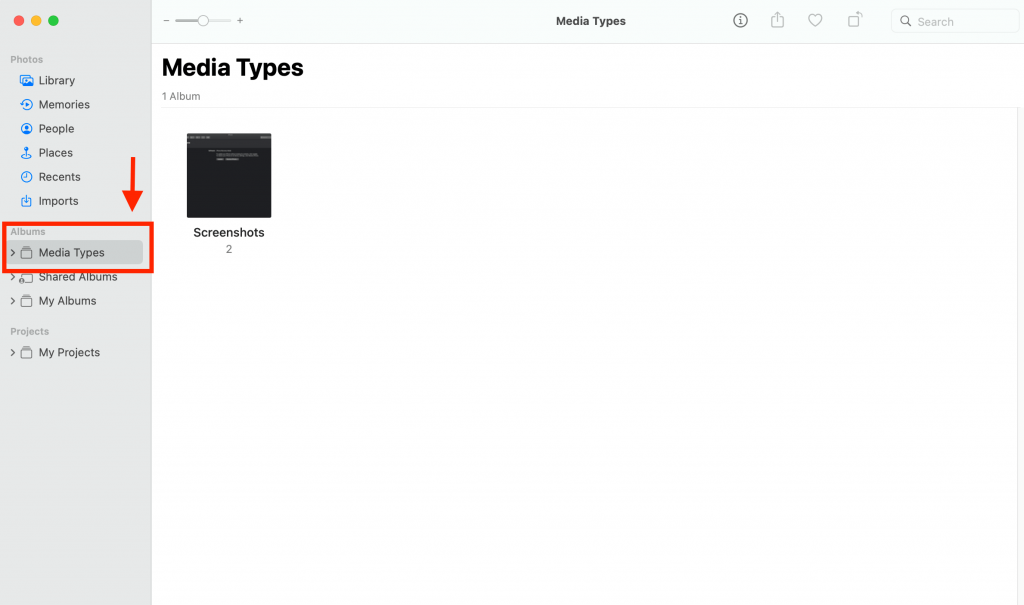
- Open the Photos app from the dock or application menu bar on Mac
- Select the Media Types folder below the Album
- Go to the “Live Photos” section.
Capture Live Photos in FaceTime Without Notifying the Other Person
The biggest drawback of capturing a live snapshot during a FaceTime call is it notifies the other people. It is impossible to capture a live photo without informing the other person. However, there is one trick that seems to work.
For iPhone and iPad
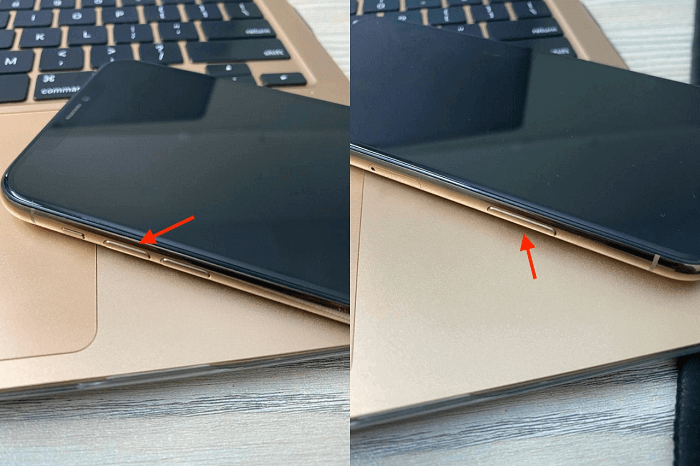
- Press the Side Button and Volume Down buttons on your iPhone or iPad. The Screenshot will save your snapshots from FaceTime calls.
- You can also press the Side Button with the Home button for the iPhone versions earlier than 8 plus.
For Mac PC
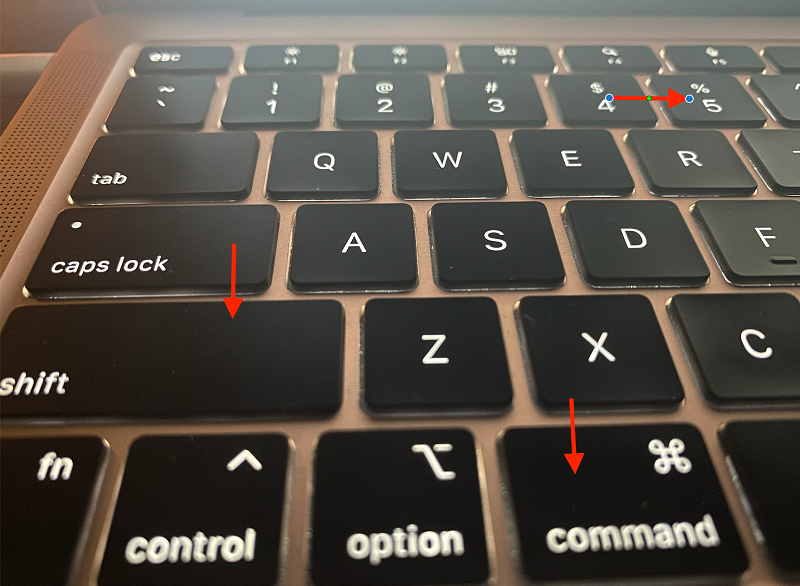
- Press Cmd + 5 + shift on the Mac device and tap on the FaceTime window to take a live photo.
Why Can’t I Capture Live Photos?
If you can’t take a live photo during a FaceTime call, it’s probably because you have disabled live photos from the Camera app and FaceTime.
Here’s how you can resolve this:
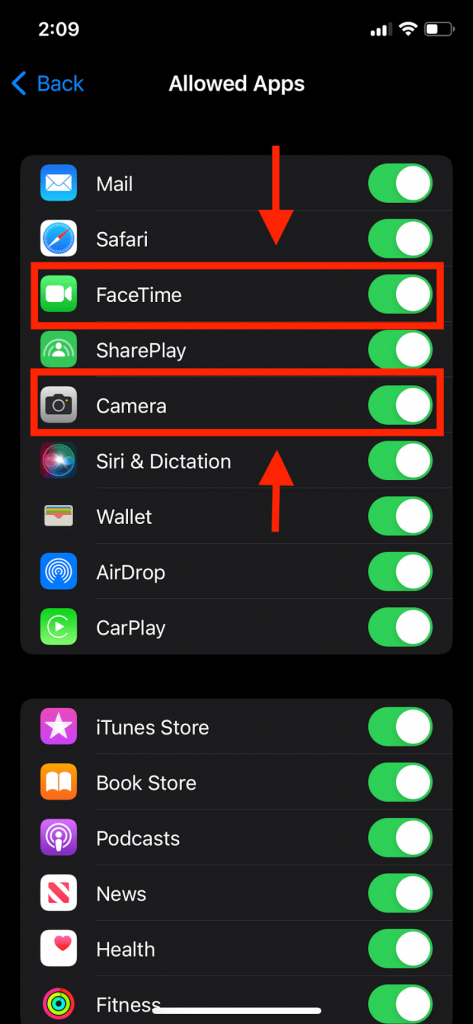
- Navigate to the Settings app from the home screen
- Scroll down and tap on the Screen Time section
- Go to Content & Privacy Restrictions
- Select Allowed Apps and ensure the Camera and FaceTime are enabled for the live photo
Why Is FaceTime not Saving the Live Photos?
iOS users commonly find themselves in a loophole of understanding where the photos taken from FaceTime are saved. It’s one of the most common problems with FaceTime.
Here are two methods to resolve if FaceTime can’t save your live photos.
- Restart Your Device
If both the people on the FaceTime calls have enabled the live photo feature and still can’t take a live photo during the call, perform a quick device restart.
A restart on your Apple device or mac computer may resolve this problem. Restarting your device can refresh the FaceTime app and any software glitch preventing the live photo from taking a snapshot.
- Hold down the Power Button of your iPhone until a dialogue bar, “Slide to Power Off,” appears on the home screen.
- Release the power button and slide the bar to the right side.
- Your device will be blacked out.
- Wait and press the Power Button again until the Apple logo appears.
- Allow your device to switch on and open FaceTime to see if photos are now saving.
- Update Software
The feature to take FaceTime live photos was only available till iOS 12. It was stopped and removed till the iOS 15 update. If facing FaceTime problems, ensure your device is updated to the latest version of the iOS operating system.
Wrap Up
Nothing brings more pleasure than recalling the special moment and conversations shared with your loved ones. The FaceTime and live photo features allow you to store priceless moments during your call. We hope the strategies mentioned in this article can help you get the most out of FaceTime.

